|
|
|
Who's Online
There currently are 6007 guests online. |
|
Categories
|
|
Information
|
|
Featured Product
|
|
|
 |
|
|
There are currently no product reviews.
 ;
Thank´s for your help, I already recived these manual from you
;
Thank you for your manual It has the basic things to and i use the Oszi for Longer Time.
THX
;
Actually, I was looking for this information for 3 years!...now thanks to you, the manual is on my hands and of great help, cause I understand now where I was doing wrong connections and wires...excellent, I'll be back to you if in need, thank you.
 ;
This manual covers the main equipment features only. While it also includes the procedure for saving and loading from the now long obsolete memory cards it does not mention the how to operate with the optional floppy drive interface so I am still at a loss about how to use this! Note that there is a separate manual covering the MIDI interface and programming via the keyboard, not included in this download. You will also need to get hold of this if you want to use the MIDI interface properly. Basically there is little difference between this manual and the free to download manual for the similar PR60 model.
;
Good list of manuals. I found a very rare one and easily get. Should be promptly to download, as we must to wait hours even after confirmed payment.
Austauschen der Lampe
Entfernen und Installieren des Lampenmoduls
VORSICHT
� Sicherstellen, da� das Lampenmodul am Handgriff entfernt wird. Nicht die Glasoberfläche des Lampenmoduls oder die Innenseite des Projektors berühren. � Um Verletzungen und Beschädigungen der Lampe zu verhindern, sollten die folgenden Schritte befolgt werden. � Die Lampe kann sicher ausgetauscht werden, wenn das Netzkabel nach dem Ausschalten des Projektor abgetrennt wird.
Lampe 1 Lampe 2
Ansicht von oben
1
Das Gerät ausschalten.
2
Den Hauptnetzschalter ausschalten.
3
Die Abdeckung des Lampenmoduls entfernen.
Die Betriebstaste OFF drücken. Warten, bis der Kühlventilator zum Stillstand kommt.
Den Hauptnetzschalter ausschalten. (Das Netzkabel abtrennen.)
oder
Die Benutzer-Wartungsschraube lösen, mit der die Abdeckung des Lampenmoduls auf der Rückseite des Projektors befestigt ist. Dann die Abdeckung in Pfeilrichtung schieben (in Richtung der Markierung für Offen).
4
Das Lampenmodul entfernen.
5
Die Abdeckung des Lampenmoduls wieder anbringen und den Hauptnetzschalter einschalten.
6
Die Betriebstaste ON auf dem Projektor drücken. Die Lampenaustausch-Anzeige blinkt rot. Auf dem Projektor ENTER zum Zurückstellen des Menüs zur �Lamp.-Timer� drücken.
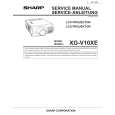
Die Halteschrauben vom Lampenmodul entfernen. Das Lampenmodul am Griff halten und horizontal herausziehen.
Halteschrauben
Die Abdeckung des Lampenmoduls auf der Rückseite des Projektors in Pfeilrichtung wieder aufschieben (in Richtung der Markierung zum Schlie�en). Dann den Hauptnetzschalter einschalten.
Die Betriebstaste ON und dann ENTER auf dem Projektor drücken.
ON
Halteschraube
ENTER
Wartung und Fehlersuche
7
Den Hauptnetzschalter erneut ausschalten und die Abdeckung des Lampenmoduls entfernen.
8
Ein neues Lampenmodul einsetzen.
9
Die Abdeckung des Lampenmoduls wieder anbringen.
Den Hauptnetzschalter ausschalten und die Abdeckung des Lampenmoduls auf der Rückseite des Projektors in Pfeilrichtung schieben (in Richtung der Markierung für Offen).
Das Lampenmodul fest in das Lampenmodulfach einschieben. Die Halteschrauben anbringen.
Die Abdeckung des Lampenmoduls auf der Rückseite des Projektors in Pfeilrichtung wieder aufschieben (in Richtung der Markierung zum Schlie�en). Dann die BenutzerWartungsschraube wieder anbringen.
� Die Verwendungszeit der Lampe mu� jedesmal nach dem Austauschen der Lampe zurückgestellt werden. Stellen Sie sicher, da� dieser Punkt im Menü zur �Lamp.-Timer� zurückgestellt ist.
72
|
|
|
> |
|